Thursday, October 24, 2013

So little time to blog, so little time to walk

It is true, like most of us I often have the feeling of having too little time to do all the things I would like to. Two weeks ago I made a list of all the places I would like to go and last week, this list doubled. And this was without making an effort or any real deep thoughts on what to do and where.

To name but a few:

  • The Yukon
  • Both the geographical poles
  • Greenland
  • Patagonia
  • Nepal
  • Lake Baikal
  • Sahara (this time on foot)
  • And so on....

I want to go there on foot, skis, by kayak or else. I don't really care actually.

Some plans are more clear then others; to the poles would be on skis (my preference) and are probably the hardest to achieve of the above list, but crossing the Hardangervidda can be done by foot in summer and skis or snowshoes in winter. Lake Baikal can be circumfered or crossed by foot, skis or snowshoes.

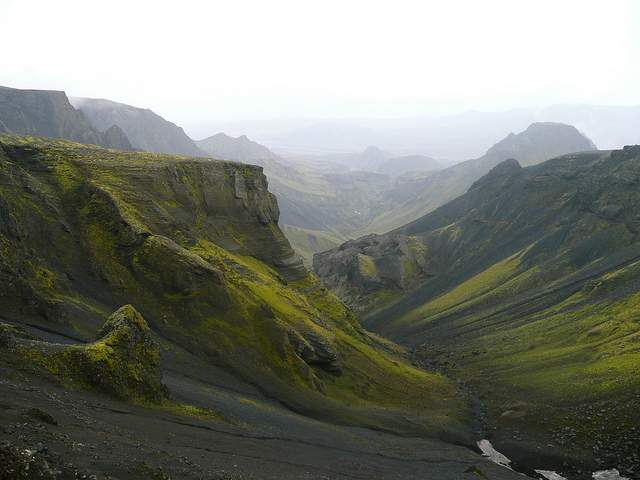
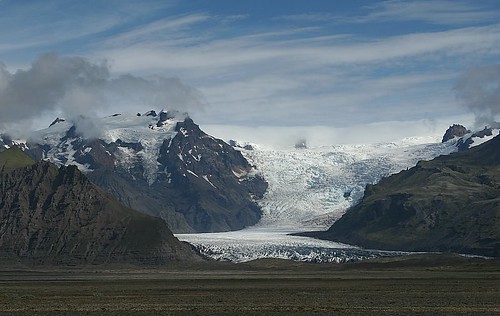
One of the places I want to visit since quite a while is Iceland. We all know the images of the rugged terrain with green hills, glaciers, lava, geysers, snow and wind. I want to go there and I want to go there doing something I never did before.While searching online for all the possible things to do, I visited the blog of Louis-Philippe Loncke: Belgian explorer with a couple of firsts on his name. One of those being a summer and winter crossing of Iceland, solo and unsupported.
Next to this I already had a strong interest in thru-hiking: the Appalachian trail, Pacific Crest Trail, Continental Divide, John Muir Trail, Alpine Pass Route, Te Araroa trail to name some of the most (in)famous. Some are more extreme then others but all factor in long distances and being away from home for quite a while, but I guess your shelter will be called 'home' fairly quickly...

Summer 2014
It hit me: I am going to cross Iceland from north to south in summer and by foot. And by doing so I still want to visit some of the popular tourist attractions like the waterfalls and the Landmannalaugar trail. The goal of the trip for me is enjoying and experiencing  the country in everything it has to offer from top to toe, or from lighthouse to lighthouse actually.

A second goal is doing so while keeping my base- and pack weight lower then I did before. I only recently started lightening my base weight but I already went from 10,5kg to 5,5kg (23 to 12 lbs). Not bad but this is for a week long trip in a moderate environment, not in Iceland where apparently the wind gusts are worse then anywhere else (depends on your source of information...) and it is hot one moment and cold the next.

I made up my mind but my girlfriend did not do so immediately. She had a bit of trouble seeing herself walking for three weeks straight, wearing a pack and going over some rough terrain. However, after some motivational speeches by yours truly, she was convinced of her own strength and capabilities. I never had a doubt: she walked for a few days with an 18kg pack in Sweden, with a 15kg pack in the Ardennes and she completed the Walk of the World this year for the second time: 4 days of 40km each. I will leave you Imperialists to do the math on this one...

Preparations
I could not help myself and started right away; it's that bug that a lot of us have and it grows each time you read someone else's trip report, see photos of magnificent nature scenes and when you're making new plans or day dreaming about them. It's addictive and I do not believe a feeling like this will ever go away. I for one, start making plans for the next trip before I'm even close to the first.

For this trip I bought me a 1:250.000 map to start setting a general route using see through plastic sheets on which I draw my possible route with a marker. Next to that, I once got a Lonely Planet from my friends for my birthday which now helps me finding those beautiful and not-to-miss places along the route.
I also started searching for plane and bus tickets and schedules online and contacted some firms to see what they offer and what the approximate costs would be.

Next steps
What shelter to take? What sleeping system? Expedition or thru-hiker style? These questions and more will all be answered anytime soon since no day goes by without thinking about it or sending a quick email or looking up that little part of the route that still bothers me....
One thing I still think about is whether or not to give this undertaking a name. Something that defines the trip and where it stands for, for me and my girlfriend. So if anyone has a good idea for name, leave it in the comments.

Updates on this trip's progress will follow.

Tuesday, September 10, 2013

Trip report: Time for a review on summer

Summer went by too fast, my last post is almost 2 months old. Worst thing is, I did not even have the time to take my new MYOG stove in to the wild, which was the subject of my last post. I did however took my time for a few trips:

1. Walk of the world

2. Karwendel Mountains

3. Lago Iseo and the Bergamo Alps

4. Chamonix Mont Blanc


It was one bombing summer! And now I have to spend at least half the Autumn behind a laptop, trying to put it all on "paper". I am not yet sure how if and how I am going to do this, but it wanted to share a bit of my summer experiences since it was so quit here for all this time.

Walk of the world
4 days of 50km per day (31mile) is nothing to take easy. It was the third consecutive year I did it and I'm glad I spent a lot of weekends practicing my mileage. Again.
But I had fun: I walked the 50km together with a friend, who unfortunately had a lot of problems with blisters and painful feet. Luckily I survived the entire 200km without blisters or (any excessive) pain. My girlfriend walked the "girly" distance of 40km per day (25mile), also without any blisters but with a smile on her face (at least until the finish line of day 4).

I am not yet sure if I'm going to walk this event again next year; all the weekends of training take up so much time that the fun is escaping slowly. So my goal is to walk a long distance event once in a while and go out for an overnighter more often to keep my feet up for the job. We'll see how that goes.

Karwendel
We spend 2 days here, one of which we actually walked in the mountains. Our second day we spend in the beautiful city of Innsbruck which has a rich history and a very close link to the mountains it's surrounded by. Apart from the fact that it a nice and easy accessable mountain range, it was also a good place for us to take a break from driving, because we were going to Italy; to the Bergamo Alps.

Bergamo Alps
We booked a campsite directly next to the shores of Lago Iseo. A very nice lake but temperatures of over 35 degrees Celsius (95 degrees Fahrenheit) sometimes made it hard to actually go out and do something else then swimming and sunbathing. Not a punishment after walking all these miles in the last few weeks.

Luckily in the higher mountains the temperatures dropped to an acceptable degree so we were able to walk a bit.

Chamonix Mont Blanc
My first time trying actual mountaineering and I loved it. We spent the first few days breaking in the new shoes, trying out our new crampons on a glacier and doing some mild ice climbing. At the end of the first week we tried our best on reaching the summit of the Petite Aiguille Verte (3.512m or 11.522ft.) but unfortunately this turned out in a rescue operation...I will explain in a post soon.

We were able to reach the summit of the Bishorn in Switzerland (4.153m or 13.625ft.), which was also a training for our bigger goal: the Mont Blanc itself.
Unfortunately we weren't able to get reservations in the busy Gouter hut, so we set out to investigate an other route via the Mont Blanc du Tacul. We went up for a look on a Tuesday, to find out 2 people were killed by an avalanche that same morning. Looking at the snow and ice that was still waiting to slide, we decided not to try to summit the Mont Blanc.

Because we weren't going to the Mont Blanc and one of my teammates had a sprained knee, we decided to spend our last 3 days in Chamonix by climbing rocks: awesome!

I will dedicate a post to everything we did in Chamonix soon but for now I am glad I finally found the time to write something again.


Sunday, July 14, 2013

Cooking setup part 2 (Evernew Titanium Mug Pot 500 and MYOG solid fuel stove)


A while ago I explained how I went from the idea of taking a lightweight alcohol stove to just going with a gas stove. After a bit of research I bought me a Fire Maple 300t stove and ordered an Evernew Titanium Mug Pot 500. The pot came too late for the trip I planned so I had to use another pot instead, which was heavy compared to the Evernew (73g, or 2,6oz, including lid on my scale).

Evernew pot
The pot comes delivered in a mesh bag which is in a carton, this gives it a nice and almost luxurious look. The pot itself looks nice, a single piece of titanium with spot welded pieces added to attached the handles. The folding of the handles is not too loose, so you will always know where they are when grabbing for it. The lid fits perfect and with the rubber around the handle it is safe to handle when hot.

Although I couldn’t use the new pot during this trip and I didn’t have the time to go on a next, I took it for a test drive under stable conditions in my kitchen. I weighted the gas canister before doing the test and measured the room temperature: 14 °C or 57,2 °F.


I did the same test with the gas opened about half way and with max power. Room and water temperature were the same in both tests. And the results were somewhat surprising:


Half power: 7 grams of gas and a rolling boil in 4 minutes and 45 seconds.

Full Power: again 7 grams of gas but a rolling boil in 3 minutes and 50 seconds.


Like expected the full power test was quicker to a boil but the exact same gas usage was a bit unexpected. Probably just coincidence.
Note that the volume of this pot is 500mL but approx. 450 (15oz)  is usable if you want to use the lid. So, just under 4 minutes to boil not even half a liter of water is not fast but really, what else are you going to do? 

Since you have time on your hands (apart from the bad weather hurries once in a while) you might as well take some more time to prepare your dinner; as I expected when using solid fuel to cook. And because I was still not at enough peace with myself to start on a new can stove for use with alcohol, I started with making a "Brian Green Esbit stove".


MYOG Esbit stove
Brian made a nice, easy to use template which I printed, cut out and taped to a piece of cut open can. Using a needle I poked holes where the end of each cut would be; this prevents the aluminum from tearing once you start folding, so do not forget this if you try it yourself. Which is kind of the goal with a MYOG project...and you already know you want to, am I right?

I made the cuts with an old pocket knife which I sharpened. Just place the tip on the hole you made with needle and make nice and easy cuts, shouldn't be to hard if the knife is sharp. After you cut out the entire stove, you can take of the paper template. Using a ruler you can trace the bends and after this, the real fun starts: bending right on the marks in a perfect 90 degree angle and with the nice Z-fold, this should keep you going for a while. Don't forget the tiny strips that have to be bend underneath the "feet". It actually went quite well for me, because I happened to have a pair pliers that fitted nicely.

And there it was: my first-try-went-well-MYOG-esbit-stove. No rips or anything, just a little crooked. First thing I did was put it on my scale, speaks for itself:
I need a more accurate scale...


Of course, the piece of Esbit fuel did not fit exactly into the stove but it still went well for my first try. So it was time to test the stove. First thing I noticed I have another MYOG project coming up to make something that can hold back the wind as well as hold up my pot. So I used my barbecue for this run:
The numbers are quite good: the cube burned for over 16 minutes, of which the first 15 minutes was actually useful. But since I wasn't paying attention I put my pot above the stove at already 2 minutes in....and it didn't come to a full rolling boil. I believe that if I bring the pot down some more (now 40 - 50mm or 1,5 - 2 inches) and put it on from the start, I will get the full pot of water to a boil easily.


Steps to take next
The next project will have to wait for a little while since the Walk of the World is next week. A nice time to see if my feet are still up to the challenge. A small pack will be all to carry during this walk, about 2.500g (88oz) excluding any snacks and water.
After this it is time for my summer holiday so I will have some new stuff to blog about then.

Tuesday, June 11, 2013

Trip report: GR57, planning and setup


The Trail
I wanted some time off for a spring season trip and thanks to some national holidays I could have a 13 day time frame while I only had to take 7 days of work. I had a book laying around about the GR57 which is a trail through the valley of the Ourthe river and the Sentier du Nord.The tour leads from Barchon in Belgium to Gilsdorf in Luxembourg. 
http://www.traildino.com/img/upload/Europe/Belgium/Map/Hiking-map-Belgium-GR57.gif
Map via Traildino

The complete trail is 279km (173mile) and takes you through the heart of the Ardennes and is easy to divide into smaller weekend trips.

Although I have experience with long distance walking, the last time I did a multi day trekking was almost a year ago and the daily distance was less then 20km per day (12,4mile). My pack was going to be lighter than it was then but I doubted what distance I would be able to cover per day. I was sure however that I would not be able to walk the entire trail in 12 or 13 days. Probably 12 so I would have a spare day in the end to clean all my gear and get some decent rest before getting back to the office.


Gear and mileage
I decided to first make a gear list and weigh everything to know how much I would be hauling around. I weighed my total pack before but never individual items and let me tell you that once you start there is no way back: you weigh your tooth brush, only to find out there is another model tooth brush in your house which is 5g lighter (<0,2oz). This may not sound as much but the 5g difference between the two is a 25% saving. Imagine everything in your pack being 25% lighter...that is nice isn't it?

I find making a gear list is a nice way of starting the holiday fun so the list was easily made. There were some items which could use a diet, for instance my cooking system, sleeping system and tent. I made a list of the food I wanted to take and I was making good progress with my trip planning.

I loaded my pack a few times and went for a walk which made me decide to go for approx. 25km per day (15,5mile) on my trail. Together with the book and some help of the internet I planned every day, starting with an easy day of 20km and never more than around 26km (12,4 - 16mile). I was going to use mainly camp sites to spend the night and the occasional night in the woods and my total distance was going to be 245km (152mile) in 12 days, meaning I would start in the town of Esneux and finish at the official end of the trail in Gilsdorf. I reckoned I would not need any resting days since my daily distance wasn't that great and I had all day to cover each distance.

Using colorful see through markers I marked the campsites on the map, as well as the resupply stores if I was going to need any: water would be available on the camp sites and my plan was to take all my food from the start for 9 days of walking. On the ninth day my girlfriend would join me in the evening for the last part of the trail so she was going to bring the rest of the stuff we were going to need.


Food planning
Food for 9 days can be quit some, but since I also wanted this trip to be some sort of training for more remote and self sustainable trips in the future, I did not see this extra weight as a problem. I was aiming for at least 2.500kcal/day and I hoped for around 500g/day (17,6oz/day). Some might argue 2.500kcal per day is too little but I am not that big of an eater and I didn't care if I would lose some weight during this trip.

Freeze dried food was already my choice for diner so that wasn't to hard. I chose Adventure Food (a Dutch company) because I previously tasted some of their meals and I liked it. Their 1-person diners each have 600kcal and the ones I took weigh between 160 and 175g (5,6 - 6,2oz) including the bag it comes in. Fine by me.

My breakfast I prepared using fairly cheap cereal, full milk powder and powdered sugar. 120g of cereal, 20g of milk powder and 5g of sugar in a 4g ziplock bag was going to be my breakfast for the complete trail (4,2/0,7/0,17/0,14oz = 5,21oz). Each bag holds 674kcal which means a nice start every morning.

For lunch I would take simple crisp bread with chocolate spread and something we Dutch call "kokosbrood". I have no idea what's the English word for it, but it tastes great, is easy to take with you (slices) and 413kcal/100g is a good trail food.

http://costadehuelva.active24blog.com/uploads/CostadeHuelva/image/~Kokosbrood%20001.jpg


Snacks during walking were going to be several kinds of cereal bars, waffles and some beef jerky. These were chosen mainly on taste and feel-good-powers while keeping calories in the balance.
The same was done for evening snacks: sugar coated peanuts, different kind of nuts and quite a bit of chocolate.

The food we were going to take for the last three days was basically the same, although my girlfriend likes a different type of cereal and portions had to go up.
For the first part of the trip I had an average of 606g (21,4oz) and 2.600kcal per day whereas for the second part that went down in weight as well as in calories since we also wanted to taste the luxury of going out for a bite to eat. You can go as light as you wish by not taking anything with you and just buying as you go. Check for resupply points before you decide to do so please...


Book and go
I only booked my starting point and our rendezvous. All other camp sites I had planned for I trusted they would have some room for a small tent, as they usually do. Actually, I didn't need to book anything but making sure you can start where you want and you can leave the car some place safe for the weekend, gives you peace of mind and a carefree trip, as far as that goes.

I will soon post my experiences on this trip, although my available time for blogging recently went down because of a summer trip to Chamonix I was invited for (and said yes of course). This trip will give me some more to blog about.

Sunday, May 26, 2013

Cooking setup part 1 (Fire Maple 300t Hornet)


For my solo trip to the Ardennes I wanted to go with lightweight cooking: bags of freeze dried food as diner and a light stove and pot from which I could also drink my morning coffee. So I bought a sixpack and I started a MYOG project to build a alcohol stove. This project is still ongoing… Do not let my failure fool you: I’m just a very impatient guy. This often results in teared up cans when trying to make them fit together and an angry me deciding to try again in a week or so. I will follow up on that soon.

The first failure made me rethink the alcohol cooking for this trip and by the second time I messed up I decided that for this trip I would go with a safe and clean gas stove.
Now I own a nice Primus Gravity 2 which burns a whole range of fuels, including gas, but it weighs 365g or 12,9oz and due to its large diameter burner it is not suitable for a small pot.

I went for some research and put my mind on a Fire Maple 300t gas stove in combination with an Evernew Titanium Mug Pot 500: 45g for the stove and 74g for the pot (1,6 + 2,6oz). A total weight of 119g, excluding any fuel of course, sounds great! Also, the small stove seems it would fit in the pot together with a small canister of gas, so the used space would be kept to a minimum. Just another plus.


I ordered the stove in China and it was soon in my possession. It comes in a little bag, which is nice but fairly useless, and it does what is promised: it’s small and light and it burns gas. The pot stands are titanium and about 1,5mm thick but seem solid enough to hold a pot with 500mL of water on it.


The pot I ordered in the UK and this took a little longer to be delivered than expected. It actually took that long, that I had to start my trip without it. Very unfortunate but these things happen. So I had to take a pot I had laying around. The lucky one was a 500mL pot which is used by the Dutch military. A heavy steel pot weighing in at 234g (8,3oz). Quite the difference compared to the titanium one! The size of this sturdy pot is great and you can put it right in a camp fire if you like. But since I was going to rely on a gas stove, this pot is too much.

The stove and the pot served me well during my trip. The stove folds in and out like a charm although I noticed the pivot points ran a little less smooth after about 10 uses. This is probably due to the way the pot stands are connected to the body of the stove which is a rivet like joint. By heating up and cooling down this will expand and shrink every use so there is some wear, but nothing too serious. I used it another 10 times during the trip and again a couple of times while back at home and it still works perfect. No worries there. A very cool plus of course, is that you’ll soon see the nice color changes that come with combining titanium with heat. The stove makes quite a bit of noise but not more than any other gas stove will do. The flame is steady and centered and spreads out nicely under the pot.

Cooking times for approx. 400mL were around 5 minutes, but I never took measures. Also, I did not always heat up the water to an actual boil since I had tap water available most of the time and for my coffee and tea it doesn’t need to boil, so I could preserve some gas for the trip.

I didn’t need saving since I took two gas canisters with me which I had laying around (they also wouldn’t fit inside the Evernew I was planning to take with me). One canister had only 89g (3,1oz) of gas in it and I figured I would use about 15g per day so this canister would run for almost 6 days. Because I did not always bring the water to a full boil I eventually had 7 days where I boiled a coffee, a tea and diner (approx. 1 liter/day). The other canister I used for another 2 days alone and then another 2 days for cooking for two and there is still lots of gas left in it.


Cooking for two we did with the Primus Gravity combined with an 1,2L Eta-pot which already proved itself already during previous trips. Cooking times are somewhere between 2 or 3 minutes for nearly 1 Liter of water. The Gravity is a powerful stove and it works well when cooking for a small group of people like a family.

For future trips I will look into making an alcohol stove and a small stove for Esbit tablets for which Brian Green deserves credit. Also, in the meantime I had my Evernew pot delivered and I will post a review on this sometime soon.


Saturday, May 25, 2013

Review: Gelert Solo tent


Once I had decided to walk a few days on my own, I needed a shelter that is lightweight, has a small pack size and would be easy to pitch. Sure, there is the option to take a tarp and bivi but somehow this idea doesn’t really appeal to me and when taking the weight and price of a tarp and bivi into consideration, I chose to stay with the “safety” of a tent since it is known to me for years.


I once took a The North Face VE25 on a 4-day trip with my girlfriend, ending up not even sleeping in it since there were wooden shelters everywhere (welcome to Sweden).
Now this tent is roomy for two to say the least, not to mention it is a 4-season tent so well over dimensioned for a summer outing in the forest without snow or gales. With a weight of about 4.850g (approx. 171,1oz) it also was too heavy and bulky in the pack. Not to mention the price; I was a student back then and in need of a tent I could also use for winter outings without being too expensive and I got a great deal on the TNF, multipurpose was keyword when I bought this. But for this trip I felt like a big spender.

So I was looking for cheap, meaning under €100 (approx. $130). Preferably way under that; €50 would be nice. Everyone who has some knowledge of outdoor gear, knows that cheap does not mix with lightweight. Therefore the weight limit was set at a maximum of 1.500g (approx. 52,9oz). Like the price: half would be nice.

So, there I went on a search on the web to find me a suitable shelter. Terra Nova’s Laser, Tarptent, MLD, ZPacks; it all looks nice but the prices were holding me back. Affordable as they may be for some, affordable is something everyone (luckily) can determine for their own, depending on their disposable income and what not.

And then, during one of the endless nights behind my laptop, a packable and lightweight tent caught my attention because of its price. Who would have thought! I let the numbers sink in:

Weight: 1.500g (52,9oz)
Size: 1 person
Packed size: 39 x 12 x 11cm (approx. 15,4 x 4,7 x 4,3 inch)
Prices online: about €50

BINGO! At least my demands so far were met. I did look kind of small…maybe too small? Sitting upright would be impossible for sure but how about sleeping? 250cm in length and 90cm in width (98,4 x 35,4 inch); my Exped mat is a size M so 183cm in length and 52cm in width so this should fit with room to spare for stuff. I myself am 190cm tall (approx. 6’5”) and as I sleep on my side, this should be no problem. So I ordered my Gelert Solo tent.

It didn’t take long before I received my order. Everything looks as you would expect; just fine. The tents floor is made of sturdy PU so there will be no problems with small rocks or thorns. The inner tent is mostly mesh so you'll have to pitch it properly to protect yourself from any wind blowing through.

Let’s put it on the scale:
Inner tent: 579g
Outer tent: 452g
Storage bag (after I cut out the huge manual): 36g
Poles (set of 2): 280g
Poles storage bag: 13g
Stake set (16 pcs): 293g
Stakes storage bag: 10g
Repair set: 34g
Total: 1.697g or 59,9oz

Meaning someone lied or at least did not specify clearly what the 1.500g is actually made out of. When taking only the inner and outer tent, poles and stakes it still weighs over 1.500g with 1.604g or 56,8oz. Still not disappointed for the €50 however.

I won’t take the pole bag with me and I will be taking the TNF stakes which are 12g a piece. This tent needs 16 stakes in total: 192g or 6,7oz. Since I want to store the tent in a 25L dry bag I won’t need the storage bag. The used dry bag weighs in at 65g (2,3oz) so it is heavier than the original bag but waterproof and easier to compress. So for me this setup will weigh 1.638g (57,8oz) which still is over my original 1.500g limit but did I mention the €50?

A first pitch in my parents garden makes me doubt the size however: as expected the mat fits and so do I, although laying stretched out on my back is not an option. Further, entering and exiting the tent is going to be difficult to say the least especially since my pack has to be in front of the door if I want to keep it dry at night. But instead of worrying I decided to just put it to test during my trip. The fact that I only had about 2 weeks left before departure had nothing to do with that choice. A few things bothered me still: the fact that the outer tent is staked out with very elastic cords and the guy lines are made of some elastic material as well.

But my first night in Belgium in my new Gelert Solo tent took away my worries: it rained for almost the entire night and my tent gave a drum solo for almost the entire night, meaning it stayed taut. Who would have guessed?

Staking and packing the tent is easy and doesn’t take more than 10 minutes or so each, which is acceptable to me. Although with heavy rain it can be a pain since you pitch the inner tent first. Luckily I was spared of this event my entire trip.

It rained almost every night of the 9 nights I slept in this tent and it kept me dry every night. I did notice the outer tent slacks a bit when I had a resting day and did not have to take the tent down. This is probably due to the elastic cords used to stake it out. Once I’m back home I will replace these cords and the guy lines to see if that helps. It will probably result in tearing of the seams where the guy lines are attached to the outer tent but one can take a gamble with a €50 tent.

You now know it keeps you dry, it’s easy to stake out and it’s weight is somewhat "UL". But how about life inside the tent? Well it’s not easy to inflate your mat due to the inner space, it’s not easy to change clothes due to the inner space and it’s not easy to make plans for your next day due to the inner space. Cooking inside is impossible and your sleeping bag will get wet due to condensation and the fact that you have almost no inner space. If you’re the type of person who likes to chill out inside your tent and roam about while doing gear repairs or trip planning, this tent will disappoint. But if you can set aside your preference for the luxury of (head) room, this tent will suit you brilliant.


I accepted the lack of space and the tent seemed bigger every next night. It kind of grows on you and I can only say that I am impressed by this tent. I think 16 stakes is too much, it is too low at your feet, the poles are too thin and their shape is a risk, the condensation is annoying and entering and exiting is a circus act, but I am glad I bought this tent and took it with me on this trip.
Once I changed the elastic cords and guy lines I will give it another try to see how it stays taut. In the meantime, I would be happy to answer any questions someone might have.